

Making beaded plants is a fun craft. You use wire and glass beads to make tiny succulents and cacti. These little plants never need water. They never die. As of the latest crafting trends, beaded plants are very popular for desk decor and fairy gardens. This guide will show you how to make a simple beaded succulent from start to finish. It takes about two hours. It is an easy project. You do not need to be an expert. You just need patience and the right tools. You will love having a tiny beaded garden on your desk.
Before you start, it helps to know how many beads you need. Use the simple calculator below to figure out how many seed beads to string for your plant leaves. Just enter the length of the leaf and the size of your beads.
Bead Quantity Calculator
Enter leaf length (inches) and bead size (mm).
Quick answer: To make a beaded plant, string green seed beads onto 24 gauge wire. Form a basic loop for a leaf, twist the wire at the base, and repeat to make multiple leaves. Group the leaves together and wrap the wire stem with floral tape. Place the finished plant in a small pot with foam or gravel.
| Tool / Material | Why You Need It | Difficulty |
|---|---|---|
| Seed Beads | For the leaves | Easy |
| Copper Wire | To hold beads | Easy |
| Wire Cutters | To cut wire | Medium |
| Floral Tape | To wrap stem | Easy |
| Small Pot | To hold plant | Easy |
Time Spent On Each Phase
Materials And Tools You Need
Gather your supplies before you start. You need green seed beads in size 11/0. You can use light green or dark green. You need 24 gauge copper craft wire. This wire is thin enough to go through the beads many times but strong enough to hold the leaf shape. You need wire cutters. You need green floral tape. Finally, you need a small terracotta pot and some gravel or foam to hold the plant up.
Having everything ready makes the work go faster. Beadaholique says 24 gauge wire is the best choice for beaded plants. It bends easily but keeps its shape. Pour your green beads into a small bowl. This stops them from rolling off the table. Use a bead mat if you have one. It makes picking up beads much easier.
Tip: Work in a well-lit room. You need to see the small holes in the beads clearly.
Step 1: Cut The Wire

Start by cutting a piece of wire. Cut about 18 inches of wire. This is enough to make three or four small succulent leaves. If you want to make a large plant, you will need more wire. It is better to have too much wire than not enough.
Fire Mountain Gems notes that copper wire is easy to bend. Be careful not to kink the wire. A kink can make it hard to string beads. If you get a kink, use flat nose pliers to smooth it out. Unroll the wire gently from the spool to keep it straight.
Tip: Do not pull the wire with force. Gently unroll it to keep it smooth.
Step 2: String The Beads
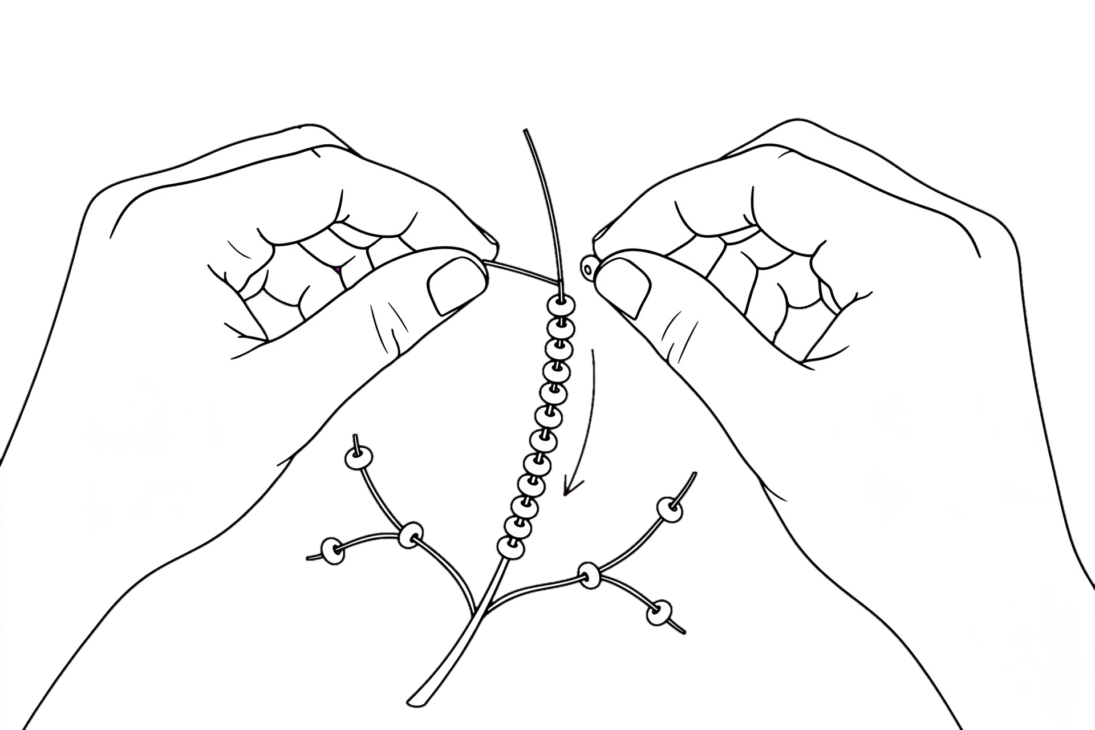
Take one end of the wire. Bend it over to make a small loop. Twist the loop a few times. This stops the beads from falling off. Now, scoop the other end of the wire into your bowl of beads. String beads until you have about 2 inches of beads on the wire.
This is the center of your succulent leaf. According to Craftsy, this center row is called the basic row. It sets the length of your leaf. If a bead will not go on the wire, throw it away. The hole might be clogged with paint.
Tip: Keep your beads close to the bowl. This stops them from rolling away if they fall off the wire.
Step 3: Make The Top Loop
Leave a small tail of wire above the beads. Bend this wire over the top bead. Push it down to the other side of the beads. Twist it a few times. Now you have a loop at the top of the basic row. This top loop holds the beads tight.
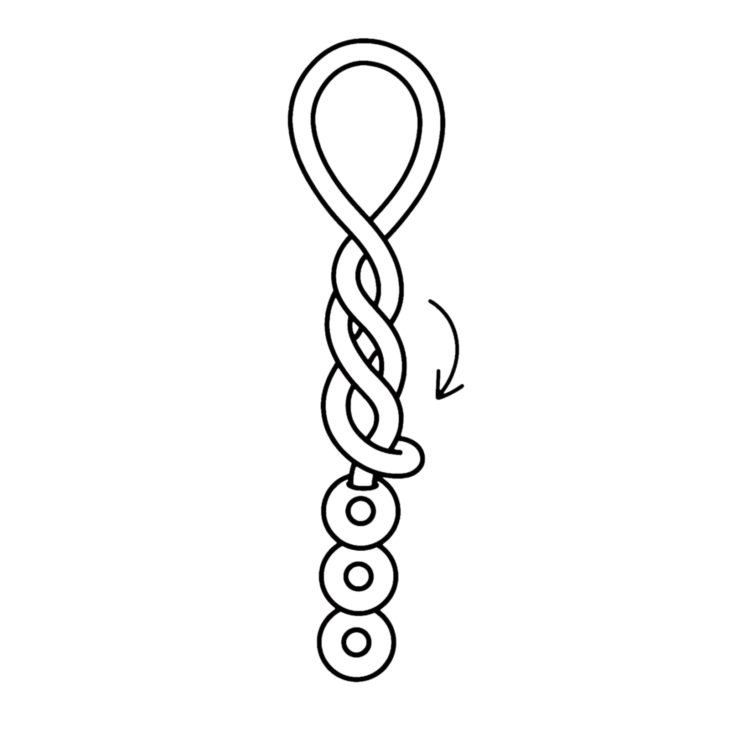
It also gives you something to wrap the wire around. Potomac Beads says to keep the twist tight. A loose twist makes a wobbly leaf. Use your fingernail to push the loop flat against the beads.
Tip: Make sure the top loop is small. A big loop will make your leaf look messy.
Step 4: Wrap The First Side
Take the long wire. Add more beads to it. You need enough beads to go up one side and back down the other. Push the beads up to the bottom of the basic row. Wrap the wire around the top loop. Now bring the wire back down.
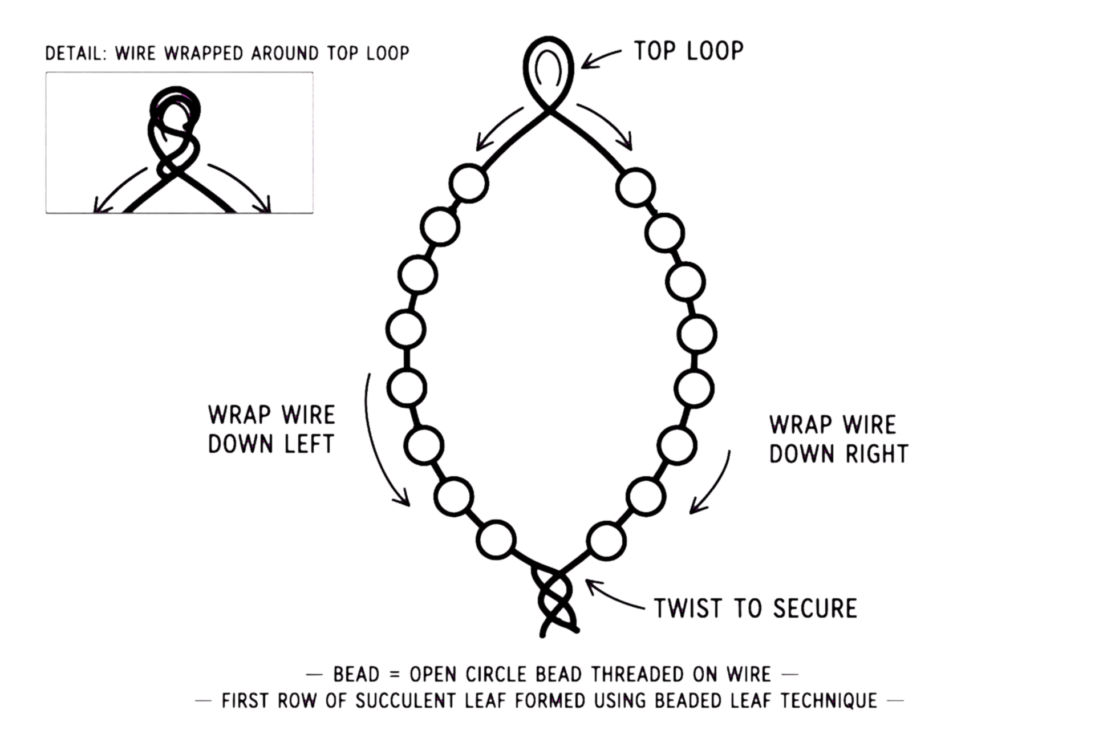
You just made the first row of beads around the center. This is called a continuous loop. AllFreeSewing says this is the easiest French beading technique. Keep the wire tight against the basic row. Count the beads you use. Use the same number for the other side so the leaf is even.
Tip: If you run out of beads on the wire, just scoop more. The wire is long enough to hold many beads.
Step 5: Make The Pointed Top
To make a pointed succulent leaf, you change how you wrap. When you get to the top, do not wrap around the loop. Wrap around the wire just below the top bead. This pinches the top. It makes a point.
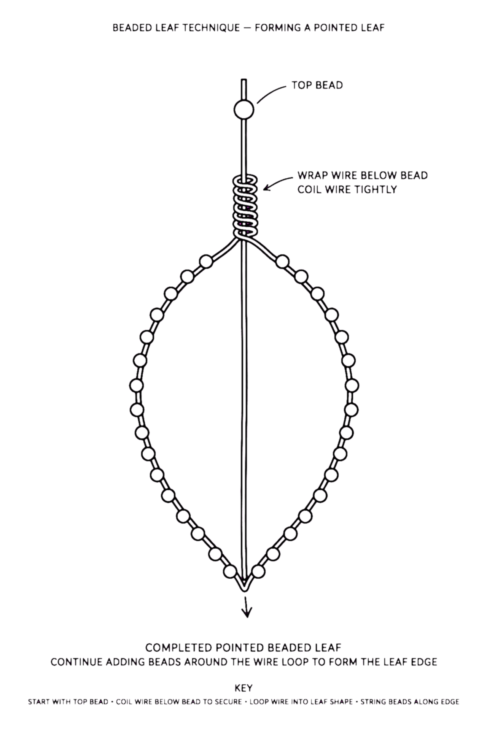
This is called the pointed petal technique. It makes your succulent look real. Fire Mountain Gems notes that pointed leaves add a lot of texture to a plant. Hold the leaf between your fingers as you wrap. This keeps it steady.
Tip: Pinch the wire tight at the top. This keeps the point sharp.
Step 6: Finish The Leaf
Keep adding rows of beads. Wrap around the top and bottom loops. Do this until the leaf is as wide as you want. When you are done, wrap the wire around the bottom loop a few times. Cut the wire. Leave a tail of wire about 3 inches long at the bottom.
You will use this tail to attach the leaves. Beadaholique says to tuck the cut end of the wire into the beads. This stops it from scratching you. Use wire cutters with a flat side. This makes a flush cut that is not sharp.
Tip: Do not cut the wire too close to the beads. Leave a tiny bit so the knot does not come undone.
Step 7: Make Multiple Leaves
One succulent needs about 7 to 10 leaves. Repeat steps 2 through 6 to make more leaves. Try to make them all the same size. You can make the leaves a little bigger as you go. This makes the plant look full.
Craftsy suggests making 5 small leaves for the center and 7 larger ones for the outside. This gives the plant a nice shape. It takes time to make all the leaves. Be patient. Keep your finished leaves in a safe place so they do not get crushed.
Tip: Use different shades of green for the leaves. It makes the plant look more natural.
Step 8: Assemble The Plant
Take your leaves. Hold them by their wire tails. Put the small leaves in the center. Wrap their tails together. Then add the larger leaves around the outside. Wrap all the tails together tightly.
This makes the plant head. Potomac Beads says to use floral tape to hold the wires together while you work. It is sticky and stretches. It holds the leaves in place. Bend the leaves back slightly. This opens the plant up so it looks pretty.
Tip: Spread the leaves out evenly. Do not put all the big ones on one side.
Step 9: Pot The Beaded Plant
Now you need to put the plant in a pot. Take a small terracotta pot. Put a piece of foam in the bottom. You can also use a piece of cork. Push the wire stem of your plant into the foam. Make sure it stands up straight.
DIY Candy says you can cover the foam with small rocks or green moss. This hides the foam and makes it look like real soil. If the plant is wobbly, add a drop of hot glue to the stem before you push it into the foam. Let it dry. Your beaded plant is now finished and ready to display.
Tip: Use a pot that is small. A big pot will make the plant look tiny. A two-inch pot is perfect.
FAQ
What wire is best for beaded plants?
Use 24 gauge copper craft wire. It is strong enough to hold the plant shape but thin enough to go through seed beads multiple times.
Can I use any beads?
Seed beads in size 11/0 work best. They are small and uniform. You can use larger beads, but the plant will be bigger and need more wire.
How do I clean my beaded plant?
Use a soft makeup brush or a can of compressed air to remove dust. Do not use water or liquid cleaners. They can rust the wire or fade the beads.
Are beaded plants hard to make?
No. The basic loop technique is easy to learn. It takes practice to get the wire tension right, but anyone can do it with a little patience.
Conclusion
Making a beaded plant is a relaxing and fun craft. You take simple wire and beads and turn them into a tiny succulent that will never die. Start with the basic French technique of wrapping beads around a center row. Make 7 to 10 leaves for your first plant. Do not worry if it is not perfect. It takes practice to get the wire tension right. Once you make one plant, you will want to make a whole garden. These plants make lovely gifts. You can put them on your desk at work or on a windowsill. Gather your wire and green beads. Follow the steps in this guide. You will have a beautiful beaded plant in just a few hours.
References
- Beadaholique. “Wire Working for Beaded Flowers.” 2023. https://www.beadaholique.com/blogs/techniques/wire-working-for-beaded-flowers
- Fire Mountain Gems. “French Beading Techniques.” 2023. https://www.firemountaingems.com/resources/beading-resources/french-beading-techniques
- Potomac Beads. “Seed Bead Plant Guide.” 2024. https://www.potomacbeads.com/blogs/tutorials/seed-bead-plant-guide
- Craftsy. “Beaded Succulent Tutorial.” 2023. https://www.craftsy.com/sewing/beaded-succulent-tutorial
- AllFreeSewing. “DIY Bead Crafts.” 2024. https://www.allfreesewing.com/DIY-Bead-Crafts

jessy
Jessy Grace has spent over 5 years researching and writing about household energy, covering everything from gas and electricity tariffs to appliance efficiency and smart meter technology. With a background in [energy consulting / utilities journalism / consumer finance], [he/she/they] specializes in breaking down complex tariff structures, regulatory changes, and cost-saving strategies into practical advice homeowners can actually use. [Author Name]'s work draws on data from official regulators, utility providers, and independent consumer bodies to ensure every guide is accurate and up to date. When not writing, [he/she/they] tests energy-saving products firsthand and stays close to industry shifts, from renewable tariffs to price cap changes, to keep readers ahead of the curve.